~ Knowledge is embodied in people gathered in communities and networks. The road to knowledge is via people, conversations, connections and relationships. Knowledge surfaces through dialog, all knowledge is socially mediated and access to knowledge is by connecting to people that know or know who to contact. ~ by someone I don't know (just being honest)

While exploring different tools in Adobe Omniture Suite, I am finding a new piece of information everyday which I'd like to share with you all. Hope you all find these informative and don't hestitate to pass your invaluable feedback. Enjoy!!!!

Saturday 3 December 2011

Additive Segments - creating complex segments

Today I'll discuss how we can save some time by creating Additive segments, another cool Discover feature which many of us do not know about.

We all love segments and why not, these allow us to find those golden nuggets from the heap of data. Discover is kind enough for allowing us to create as many segments as we can but if you are a frequent Discover user who's involved in advanced analytics, you may find yourself with too many segments. One of the reasons that leads to this situation is creating complex segments which could be created by simply merging 2 or more modular segments.

For example, you need number of visits to your shop server when customers used mobile devices.  You have a segment for Shop server visits and another for mobile visits but if you do not know about Additive segments, you may end up with a new segment which fulfils both conditions.

Creating Additive segments is not-that-well-known feature of Discover where you can use multiple existing modular segments to create new complex segments, rather than starting from scratch.

There are 3 ways to create Additive segments:
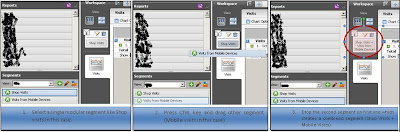
1. use CTRL key to select multiple segments from the Segments panel and drag them together
2. If you already have a workspace, select the segment to be added using CTRL Key and drag to the workspace.
3. If you are applying a column level segment, use CTRL key while dragging an already created segment and drop it over column.

  Image 1: Select multiple segments using CTRL key
                                                                  

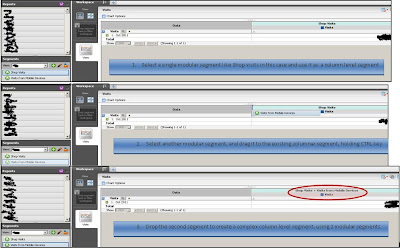
Image 2: Creating Workspace level complex Segments using Additive segments

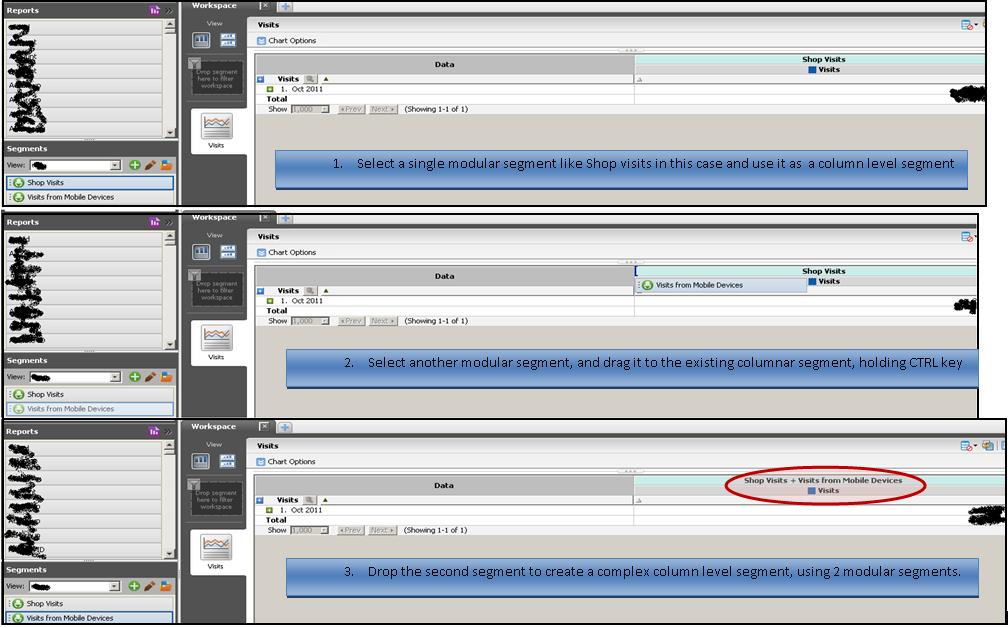
Image 3: Creating Column level complex Segments using Additive segments

Additive segments is a cool feature which helps you by:
1. Saving time in creating new complex segments
2. Simplifying segments creation as now you need just modular segments and create complex ones on the fly
3. Making segment management easy by keeping the number of segments manageable

Hope you'll like and use this tip!!!

Wednesday 2 November 2011

Trending multiple cells in Discover

Welcome back Rajneesh!!! I heard my soul stating this on my return after one year. All this time, I was still learning, waiting for this day when I can again start share more. I hope I may maintain the momentum this time so keep providing your valuable feedback.

First of all, many thanks to my friend Andrew Wathen for providing initial tips to kick-off this second inning.


 So, everyone loves trends and so do Discover users. We many times simply hover on the cell we want to trend and click on that tiny image to see the trend which looks like below:


Now clicking on Launch Trend Report button opens another report with all dates in the report range on left and metric values corresponding to the selected cell on right, for the selected dimension value.

 
What if you need to do some calculations on the basis of trends against multiple metrics? I used to trend individual cells, launch the trended report, copy data and paste it in a spreadsheet program like Excel and then do necessary calculations. This can take good amount of time if you have many cells to do calculations on.

A really simple tip (not sure how I missed it, you should not as you just read this article) is pressing Ctrl key and select multiple cells, right click on one of the selected cells and select option Trend Cells (you will note if you are careful that option says Cells, not Cell!). The result is each metric being trended for the selected dimension value. You can also select multiple dimension values which means more number of columns in the new trended report.

Now how this cool feature be useful:
1. Trended comparison view of multiple dimension values. For example, if you want to see Visits and Exits to Homepage and Registration page over a period of time, add these 2 metrics, select both pages in the Pages report and use Trend cells which will contain 4 columns, each for combination of a page and a metric.

2. Most of the Discover users must be facing issues in trending calculated metrics over time because of a Discover defect. As a result of this, your favorite metrics like Bounce rate against a page, when trended, show irrelevant data (if you haven't tried this, give this a go). I haven't found any solution to this defect but a close workaround is to select the metrics used in the calculated metric rather than calculated metric itself and use Trend cells feature to get the data which you can copy and paste in an Excel sheet and then run calculations. Most of the times, you'd just need to apply the formula in top row and drag it to apply on  all.

Hope this saves some of your precious time...